Configuration
The purpose of this section is to introduce users to the various settings available to tune Inlinino. It also explains how to add a variety of instruments to the interface in addition to plugin custom instruments.
- All Inlinino’s configuration is located in two json files:
- inlinino/src/cfg/default_cfg.json
- inlinino/src/cfg/<user_cfg>.json (user specific)
default_cfg.json should not be edited and is the first thing loaded when Inlinino starts. The path to the user specific configuration file should be specified as an argument when starting the application (More details in the User configuration section).
- The configurations files contains 3 sections:
The two first are generally setup in default_cfg.json and are less susceptible to be ajusted. The instruments section is often the only section in <user_cfg.json>, in case any parameter from default_cfg.json needs to be modified in <user_cfg.json>, the entire section need to copied otherwise parameters will be missing and error will showup when starting Inlinino.
Table of Contents
Application
The main configuration of the application is done in the section app_cfg.
interface: "< gui | cli >"The two options are:
Most of the functionnality are available on both interface. The GUI is recommended for people that want to visualize data in real-time and do not have any ressources limitations (Inlinino usually run using 1-5 % of the CPU). The CLI is meant for use on servers without X or on computer with limited ressources.
Note
A web interface might come out in further realise in order to monitor data from ship network.
theme: "< inside | outside >"Available only for the gui interface. The two options are:
- inside: the gui will be dark for a confortable use in lab or by night
- outside: the gui will be bright for a confortable use outside in a sunny environment
ui_update_frequency: <float>Available only for the gui interface. Frequency (in Hertz) at which the user interface is refreshing. This value is only for updating the figure and the digital display on top left. It’s not taken into account for logging purposes.
A recommended value is one 1 which correspond to updating the gui every second.
Note
If your computer is going very slowly when Inlinino is running trying to decrease the value should make it more fluid.
ui_disp_pos_shift: <int>Available only for the gui interface. This parameter allow to shift the digital display of the instrument on the top of the side bar.
1 would set the digital display just after the clock (see image bellow).
3 would set the digital display at the line below.
Note
This feature is usefull especially when using instruments with 3. 6 or 9 channels such as the ECO-Triplet or the ECO-BB9 which allow to have one of them per line.
verbosity: < int >This parameters take an integer between 0 and 5 0 corresponding to no informations relative to the application will be displayed 5 corresponding to a high verbosisty of the application
Note
Deprecated parameter, this parameter will be removed in futur release of Inlinino. Consider using the argument
-Owhile starting Inlinino instead.
Example of configuration for the Graphical User Interface:
"app_cfg":{
  "verbosity":2,
  "interface":"gui",
  "theme":"outside",
  "ui_update_frequency":1,
  "ui_disp_pos_shift":1
}
Example of configuration for the Command Line Interface:
"app_cfg":{
  "verbosity":2,
  "interface":"cli"
}
Log
The log section of the configuration file concerns all the parameters of the logger, the core of Inlinino.
frequency: < float >Frequency (in Hertz) at which data is read from all the instruments and saved in the log file.
If multiple instruments are running at different frequency the logger frequency should be set to the maximum frequency in order to record all the data.
Note
If an instrument did not update its cache between two reading of the logger a NaN value will be kept at that time.
interval_write: < float >Interval at which data is written on the hard drive, a small interval will be hard for the hard drive whereas a too big interval might drive to a lost of more data in case of sudent power off of the computer.
The interval units are
1/frequencysecond(s). For example:frequency = 1 interval_write = 60 --> buffer is written every 60 seconds on the hard drive
Note
OSX seems to keep in a buffer the data up to when the file is closed, this result in lost of data in case of sudent power off of the computer. The maximum lost of data in case of unpredicted behaviours on OSX is determine by the length of the file. Windows is not affected by this issue.
buffer_size: < float >Size of the buffer (in seconds) to keep data in memory. This determine how much data will be plotted on the figure of the interface.
The
buffer_sizeneeds to be striclty greater thaninterval_writeThe
buffer_sizeunits are1/frequencysecond(s). For example:frequency = 1 buffer_size = 120 --> the figure of the GUI will display the last 2 minutes of data collected
Tip
If using Inlinino with the Command Line Interface the best size for the ring buffer is:
buffer_size = interval_write + 1Note
using a big ring buffer will make the application very slow as there will be more points to plot on the figure.
Note
Inlinino use a ring buffer in order to be able to run for weeks in a row.
length: < float >The length parameter caracterize how long the log files will be. The units are minutes.
The length parameter should be :
length >> interval_writeheader: "< string >"The header parameter indicate what should be the prefic of the log file name. This parameter can be modified (in the GUI or CLI ) when the application is running.
Note
Log file name follow this syntax
<header>_YYYYMMDD_HHMMSS.csv. For example a file with the header Inlinino created July 9, 2016 at 16:01:00 UTC would be named:Inlinino_20160709_160100.csv.path: "< string >"Path to where the log files will be saved. This parameter can be changed in the GUI when the application is running.
Note
On Windows, the path need to include two backslashes as they are special characters in JSON. For example:
C:\\Data\\Inlinino".
Example of log configuration:
"log":{
    "frequency":1,
    "interval_write":60,
    "buffer_size":120,
    "length":60,
    "header":"Inlinino",
    "path":"data"
  }
Instruments
This section explains how to setup instrument in Inlinino configuration files. Multiple instruments can be connected at once.
The following instruments are already implemented in Inlinino:
- Analog connection:
- WET Labs WSCD: CDOM FLuorometer
- Serial connection:
- SBE:
- 45 Micro TSG: Thermosalinograph
- WET Labs:
- ECO-Triplet: 3 channels for backscatterers and/or fluorometers
- ECO-BB9: 9 wavelength backscatterer
- SBE:
- Simulators (for testing purposes):
- Random Gaussian Generator
- Sinusoid with noise
Inlinino is not limited to those and is meant to log data from any kind of instruments for which a python API can be made. The Adding a custom instrument section is here to get started with that.
All the instruments should include the following parameters:
instruments:{ < string > : {} }The name of the instrument is in the instruments array and correspond to the name of a name-value set. The value of an instrument contains all its parameters.
Important
All the instrument in one instance of Inlinino must have unique names.
Note
It’s a good practice to include the serial number of the instrument in his name as it helps to know where the data come from during post-processing. Example of instrument names:
BB9_007
BB3_001
TSG_254
module: "<string>"The module parameter refers to which parent-class needs to be loaded to communicate with an instrument. It usually correspond to the brand of the instrument. Module available are:
- Arduino
- SBE
- Simulino
- WETLabs
name: "<string>"The name parameter refers to which child-class needs to be loaded to be able to communicate with the instrument. Usually it correspond to the name of the instrument. Name are specific to each module:
- Arduino + ADS1015 + Board
- SBE + TSG
- Simulino + Gauss + Sinus
- WETLabs + BB9 + Triplet
Other fields are present for most of the instruments:
units: "< string >"- Units to display in the log file
variables: {}- Variables are used to specify one or more inputs from the instrument. Each variable/input can contain multiple settings.
frequency: <int>- Frequency (in Hertz) at which the instrument is expected to run.
Example of instruments configuration:
{
  "instruments":{
    "SimulinoRnd":{
      "module":"Simulino",
      "name":"Gauss",
      "...":"..."
    }
  }
}
Availalble instruments
This section will help you to set the instruments that need to be logged by Inlinino, it also cover the parameters available for each instruments.
Note
Configuration files for most of the instruments implemented are available in inlinino/src/cfg/ or C:\Program Files\Inlinino\cfg\ if you installed the application through the Windows Installer (see Quick Start).
Analog
In order to log data from instruments communicating through analog channels, a data acquisition (DAQ) device with a voltage range and resolution sufficient must be used. To date, only the PASC data acquisition system is available with Inlinino.
The parameters required for an analog instrument are:
- module
- name
- frequency
- gain (for ADS1X15 only)
- variables
- pin
- units
frequency: < int >Frequency (in Hertz) at which the Arduino will be reading and reporting voltage.
Note
Theorical maximum frequency are:
Uno ADS-1015 ADS-1115 9600 3300 860 Inlinino maximum frequency (taking into account conversion delay):
Number Uno ADS-1015 ADS-1115 of PIN SE SE DIF SE DIF 1 50 1000 500 125 62 2 25 500 250 62 31 3 16 333 41 4 12 250 31 5 10 [1] Single ended connection [2] Differential connection gain: < int >Available only for the ADS1X15 interface.
Set gain of ADS-1x15.
The ADC input range (or gain) can be changed via this parameter.
Available options are:
Gain VDD Resolution (1 bit = x mV) x (+/- V) Uno ADS-1015 ADS-1115 2/3 6.144 3 0.1875 5.0 4.88 1 4.096 2 0.125 2 2.048 1 0.0625 4 1.024 0.5 0.03125 8 0.512 0.25 0.015625 16 0.256 0.125 0.0078125 Note
A gain of two third is set with
"gain":23.Warning
Never exceed the VDD +0.3V ! Exceeding the upper or lower limits may damage a channel of your ADC or destroy it ! Be carefull with this setting, be conservative and start with a gain of 2/3 (
"gain":23) for an input of +/- 6.144 VNote
Gain is displayed on the digital display on the top left of the GUI. Gain setting is recorded in the output log file with the units.
variables: {}Each pin connected to the board need to be declared in this section. Each variable has a name, a pin name and units.
pin: "< string >"Set which pin to read measurments from.
pin single ended options are:
- SIN_A0
- SIN_A1
- SIN_A2
- SIN_A3
- SIN_A4
- SIN_A5 (available only on Arduino Uno)
pin differential connections options are (available only on ADS-1X15):
- DIF_A01
- DIF_A23
Example of configuration for logging data of an analog fluorometer, the WSCD from WET Labs. The instrument output is 12 bit 0-5 Volts, as we are taking measurements in very clear water, signal should never go above 3 Volts. In order to match the resolution of the instrument, an ADS-1015 is used with a gain setting of 1x and a frequency of 1 Hz (as the instrument operates at 1 Hz). The <user_cfg.json> file look like:
"instruments":{
  "WSCD_859":{
    "module":"Arduino",
    "name":"ADS1015",
    "frequency":1,
    "gain":1,
    "variables":{
      "fdom":{
        "pin":"SIN_A0",
        "units":"counts"
      }
    }
  }
}
Serial
Instrument with serial connection should be plug to the computer serial port or with a serial adaptator.
Inlinino is able to communicate with few specific instruments but more can be added.
- Sea-Bird Electronic (SBE)
- ThermoSalinoGraph (TSG)
To enable the SBE 45 MicroTSG the module to use is
SBEand the name isTSG. An example of TSG configuration below:"TSG_001":{ "module":"SBE", "name":"TSG", "variables":["T", "C", "S"], "units":["deg_C", "S/m", "no units"] }
- instrument name (“TSG_001”)
- The name of the instrument can be changed to anything.
- variable names
- The TSG must have three variables and they must be in the same order as the output of the instruments.
- units
- The units of the three variables should be specified in the same order as the variable names.
Note
Serial connection parameters of SBE instruments
Parameter Value Baud rate 19200 Byte size 8 Parity None Stop bits 1 Timeout 1 sec
- WET Labs
- ECO-BB9
To enable the ECO-BB9 from WET Labs, the module should be set to
WETLabsand the name toBB9. An example of configuration below:"BB9_279":{ "module":"WETLabs", "name":"BB9", "lambda":[412, 440, 488, 510, 532, 595, 660, 676, 715], "varname_header":"beta", "units":"counts" }
- lambda
- A BB9 instruments has nine wavelength, they should be specified in the same order as the data show up (reading output from the instrument on TeraTerm will help).
- varname_header
- Prefix of the variable name. It will be used to build the name of the column in the output log file. For example the name of the first variable will be
beta412in the case above.
- ECO-Triplet
To enable an ECO-Triplet (MCOMS, FLBBCD, BB3…) from WET Labs, the module should be set to
WETLabsand the name toTriplet. An example of configuration below:"BB3_349":{ "module":"WETLabs", "name":"Triplet", "lambda":[470, 532, 660], "varname_header":"beta", "units":"counts" }, "BBFL2_200":{ "module":"WETLabs", "name":"Triplet", "lambda":[660, 695, 460], "varname_header":["beta", "chl", "cdom"], "units":"counts" }
- lambda
- An ECO-Triplet instruments has 3 channels operating at 3 wavelengths, they should be specified in the same order as the data show up (reading output from the instrument on TeraTerm will help).
- varname_header
Prefix of the variable name. It will be used to build the name of the column in the output log file. For example the name of the first variable will be
beta470in the first case above.If only one prefix is given then all the channels will have the same prefix, this is intended for the ECO-BB3 or ECO-VSF instruments.
If three prefix are given, one per channel, the the prefix will be associated to each channel. Note: the order matters and should be the same as lambda.
Note
Serial connection parameters of WETLabs instruments:
Parameter Value Baud rate 19200 Byte size 8 Parity None Stop bits 1 Timeout 1 sec
Simulators
For developping and testing purposes Inlinino embeds two kind of instrument simulators, one directly in the python code as an instrument API (Embedded Simulino) and another one that run’s on the Arduino enable to simulate serial connection from any instrument (Arduino Simulino)(more information on StackOverflow).
- Embedded Simulino (only software)
The simulator embedded in Inlinino is available in two version a constant signal with a Gaussian noise and a Sinusoidale signal with a Gaussian noise. An example of instrument configuration bellow:
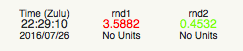
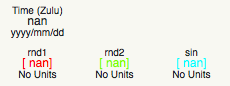
{
  "instruments":{
    "SimulinoRnd":{
      "module":"Simulino",
      "name":"Gauss",
      "frequency":1,
      "variables":{
        "rnd1":{
          "mu":2.5,
          "sigma":1,
          "seed":1,
          "units":"No Units"
        },
        "rnd2":{
          "mu":0.5,
          "sigma":0.2,
          "seed":2,
          "units":"No Units"
        }
      }
    },
    "SimulinoSin":{
      "module":"Simulino",
      "name":"Sinus",
      "frequency":1,
      "variables":{
        "sin":{
          "mu":2.5,
          "sigma":0,
          "seed":1,
          "start":0,
          "step":0.1,
          "units":"No Units"
        },
        "sin_noise":{
          "mu":1.0,
          "sigma":0.2,
          "seed":2,
          "start":1.57,
          "step":0.1,
          "units":"No Units"
        }
      }
    }
  }
}
- Arduino Simulino (require an Arduino)
The idea is to flash your Arduino with the code that simulates the behaviour of other instruments. An example of code is provided in
inlinino/arduino/Simulino.cpp. Set the instrument you would like to emulate and the mode of emulation desired commenting/uncommenting the header of the Simulino.cpp. Compile and flash the Arduino.Add the instrument simulated by the Arduino to the user configuration file of Inlinino. Start Inlinino and you will be able to connect to the emulated instrument.
Adding a custom instrument
- This section is intended for users familiar with python (if you have some coding experience that should be enough).*
Instrument are loaded when Inlinino starts following the two parameters: module and name indicated for each instrument in the user_configuration file. The module is the class contained in the __init__.py file a folder in inlinino/src/instruments/. The name of the folder should be in small letters, whereas the name of the class is sensitive to capital letters and should be exactly matching the value of module in the configuration file. The name value correspond to a child class of the module.
In the commented code below we will see how to add a new WET Labs instument. Add a file named custom.py in inlinino/src/instruments/ containing:
from instruments.wetlabs import WETLabs


class Custom(WETLabs):

    def __init__(self, _name, _cfg):
        WETLabs.__init__(self, _name, _cfg)

        # Add parameters specific to the instrument
        # Dark parameter
        if 'dark' in _cfg.keys():
            self.m_dark = _cfg['dark']
        else:
            print(_name + ': Missing dark')
            exit() # Exit Inlinino
        # Scale factor parameter
        if 'scale' in _cfg.keys():
            self.m_scale = _cfg['scale']
        else:
            print(_name + ': Missing scale')
            exit() # Exit Inlinino


    def UpdateCache(self):
        # readline wait for \EOT or timeout and
        data = self.m_serial.readline()
        if data:
            # data is a byte array
            data = data.split(b'\t')
            # Check size of data received
            if len(data) == 9:
                # Loop through each value to read
                for i in range(3, 8, 2):
                    # Get the name of the variable
                    j = (i - 3) // 2 # j = 1, 2, 3 when i = 3, 5, 7
                    varname = self.m_varnames[j]
                    # Update cache of instruments
                    self.m_cache[varname] = self.m_scale[j] * (int(data[i]) - self.m_dark[j])
                    self.m_cacheIsNew[varname] = True
                # Update count with number of data read
                self.m_n += 1
            else:
                # Incomplete data transmission
                self.CommunicationError('Incomplete data transmission.\n' +
                                        'This might happen on few first ' +
                                        'bytes received.\nIf it keeps going ' +
                                        'try disconnecting and reconnecting ' +
                                        'the instrument.')
        else:
            # No data
            self.CommunicationError('No data after updating cache.\n' +
                                    'Suggestions:\n' +
                                    '\t- Serial cable might be unplug.\n' +
                                    '\t- Sensor power is off.\n')
- The three core variables used above are:
self.m_varnames- An array of string containing the unique name of each variable
self.m_cache[varname]- An array of floats or integers containing the value that the instrument should report (displayed and logged).
self.m_cacheIsNew[varname]- An array of logicals specifying if the cache of the instrument was updated. It should be set to true every time
self.m_cacheis updated.
This custom instrument is loaded with the following configuration:
"BBFL2_201":{
  "module":"WETLabs",
  "name":"Custom",
  "lambda":[660, 695, 460],
  "varname_header":["beta", "chl", "cdom"],
  "units":"counts",
  "dark":[40, 41, 42],
  "scale":[2.5580e-07, 0.00194, 0.005216]
}
Note
The value recorded in for the instrument of this example will already have some processing applied. More advance modification of the code would be require to display processed data and log raw data.
Note
When developping a class for a new instrument for Inlinino, it is recommended to start Inlinino in debug mode.
Note
Use print() to display information in the terminal to help for debug, as Inlinino is written in python 3+.
Arguments
Few arguments passed in the python command line to start Inlinino are interpreted. They are the only configuration parameters that are not set in the configuration file.
debug mode
Inlinino use the default __debug__ variable of python in order to switch between optimized and debug mode. The debug mode allow to display more information when the program is running in order to help while developping new features or debugging in case of unexcpected behaviour.
The global constant __debug__ is true if Python was not started with an -O option (from Python documentation).
Note
It’s recommend to start the application with python -O __main__.py as the code will be optimized and therefor use less ressources.
Note
If you installed the application through the Windows Installer (see Quick Start). Inlinino shortcut start the application with pythonw -O __main__.py whereas Inlinino Debug` start the application with python __main__.py which display a terminal window in addition to Inlinino where informations are displayed.
User configuration
The path to the user specific configuration file (<user_cfg.json>) should be passed in argument, for example:
python -O __main__.py user_cfg.json
Note
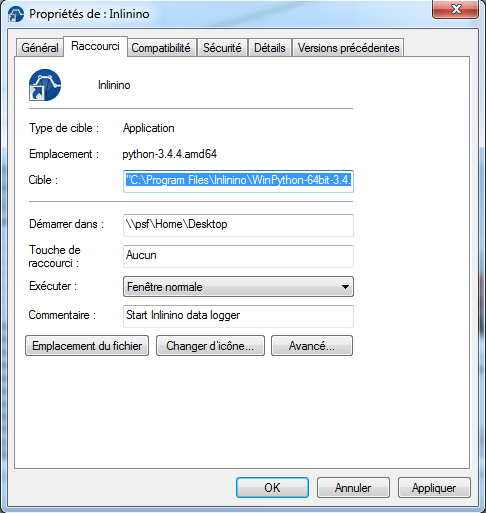
If you installed the application through the Windows Installer (see Quick Start). Inlinino shortcut start the application with pythonw -O __main__.py you can edit the shortcut properties (right click on the icon, choose properties) in order to setup your configuration file there, it would look like "C:\Program Files\Inlinino\WinPython-64bit-3.4.4.2\python-3.4.4.amd64\pythonw.exe" -O "C:\Program Files\Inlinino\__main__.py" "C:\Program Files\Inlinino\cfg\user_cfg.json"
Another way to modify path to the user configuration file is by editing line 16 of inlinino/src/__main__.py.
# Original line
Inlinino(os.path.join(sys.path[0], 'cfg', 'simulino_cfg.json'))
# User specific line
Inlinino(os.path.join(sys.path[0], 'cfg', 'user_cfg.json'))
Note
If you installed the application through the Windows Installer (see Quick Start). The __main__.py file is located in C:\Program Files\Inlinino\__main__.py by default.
Common errors
Inlinino is very sensitive, it will not like any typo in the configuration files. Those will often lead to an application not starting or undesired effect.
- Application does not start
Start inlinino in debug mode and look at the error messages displayed, it will tell you what part of the configuration file it does not understand.
If the error message is not helpfull, there is probably missing or extra:
{},"", or,.